
Ever get your hands on a game, but find yourself unable to play it for some reason? Errors surrounding games you have already paid for stand out as exceptionally frustrating. In this article, we are going to learn how to fix Minecraft is currently not available in your account error code 0x803F8001. Here is everything you need to know about the same:

Minecraft
Minecraft is a very popular game, there is no doubt about that. Due to its popularity, along with the vast world encompassed by the game, Minecraft has a plethora of DLCs for players to enjoy. There is so much you can do with Minecraft, there is never a dull day. A recent update that will be hitting the game is the Echoing Void DLC. This DLC is expected to release on July 28.
Among other developments in the game are the updates that the game has received and is set to receive. The Caves and Cliffs Part 1 update, or the 1.17 update, has brought a lot of features like blocks, mobs, biomes, etc. into the game. However, more changes, especially those surrounding the caves and cliffs of the game, will be released in the second part of the Caves and Cliffs update.
How to fix Minecraft is currently not available in your account error code 0x803F8001?
If you’ve brought Minecraft, but cannot access the game, you have come to the right place. Here are some fixes you can try in order to fix Minecraft is currently not available in your account error code 0x803F8001:
Fix 1:
- Sign out and Sign in with the correct account on Microsoft Store.
- Make sure it is the account you’ve brought Minecraft with
Fix 2:
- Make sure the date and time/Zone is correct.
- You can do this by changing your PC’s date and time settings to automatic.

Fix 3:
- Run Windows Store Troubleshooter
- Head to Windows Settings
- Click on Updates and Security
- In the Troubleshoot tab, select the Additional Troubleshooters
- Here, scroll down till you find the Windows Store Troubleshooter and run the Troubleshooter
Fix 4:
- Clear store cache Using wsreset command
- Type in wsreset in the Windows Search bar and right-click on the command
- Select Run as administrator
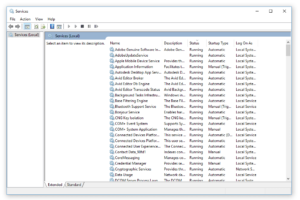
Fix 5:
- Restart Windows Update, Microsoft Store Install and background intelligence service
- Type in Services in the Windows Search bar
- Click on Services
- Locate Windows Update in the list
- Double click on it
- Make sure Startup type is set to Automatic
- Click on the restart option in the left side menu
- Repeat the same for Microsoft Store Install Service and the background intelligence transfer service
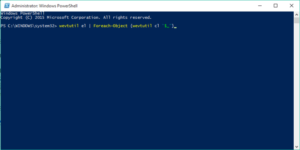
Fix 6:
- Run Powershell command to re-register store
- Right-click on the Windows icon
- Select Windows PowerShell (Admin)
- Here, paste the following command:
- Get-AppXPackage *WindowsStore* -AllUsers | Foreach {Add-AppxPackage -DisableDevelopmentMode -Register “$($_.InstallLocation)\AppXManifest.xml”}
- Press the Enter key
- Now, paste the second command:
- Get-AppXPackage -AllUsers -Name Microsoft.WindowsStore | Foreach {Add-AppxPackage -DisableDevelopmentMode -Register “$($_.InstallLocation)\AppXManifest.xml” -Verbose}
- Press the Enter Key
Fix 7:
- Uninstall & Reinstall Store
- Right-click on the Windows icon
- Select Windows PowerShell (Admin)
- Here, paste and run the following command:
- Get-AppxPackage -allusers *WindowsStore* | Remove-AppxPackage
- Follow this by Rebooting your Computer
- Open PowerShell again
- Paste and run the following command:
- Get-AppxPackage -allusers *WindowsStore* | Foreach {Add-AppxPackage -DisableDevelopmentMode -Register “$($_.InstallLocation)\AppXManifest.xml”}
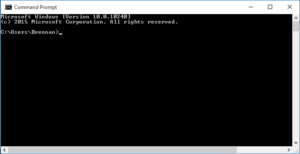
Fix 8:
- Run DISM Command
- Type in cmd in your Search bar
- Open up Command Prompt
- Paste and run the following code:
- sfc /scannow
- Once it is complete, paste and run the following code:
- Dism /Online /Cleanup-Image /RestoreHealth
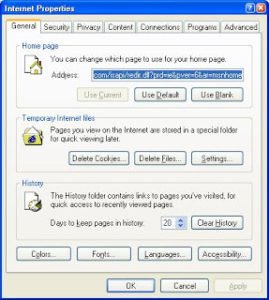
Fix 9:
- Run inetcpl.cpl command
- Type in inetcpl.cpl in the Search bar
- Open up the application
- In Advanced Tab Tick ‘Use TLS 1.2’
Other Fixes:
- Update Windows 10
- Update Apps
- Reset Store app
