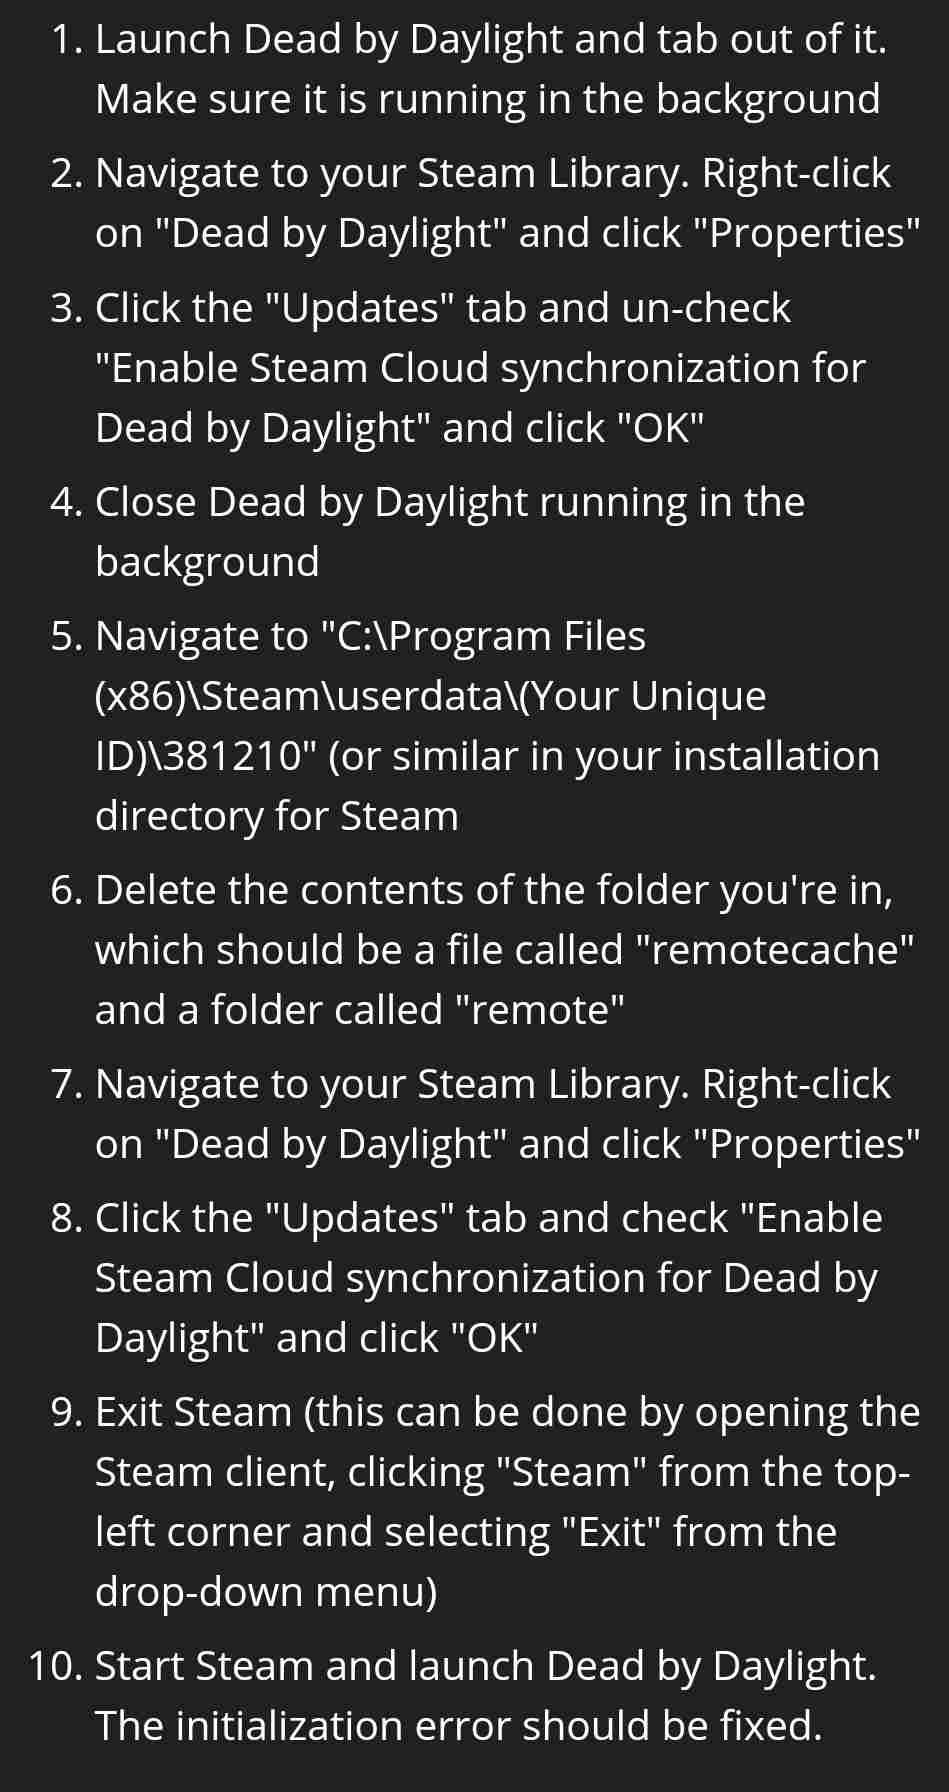
Players have been facing an initialization error on Dead by Daylight, we will guide you on how to solve this issue with a simple step-by-step instruction further into the article.
Before we get to the guide for various platforms that Dead by Daylight is available on, we should mention that the game has received two out of four of its annual chapters, as the developers have stated in previous interviews, the two chapters included the Resident Evil license, which brought various Resident Evil characters to the game and the second one includes Pinhead from Hellraisers, who everyone knows or has heard of due to its iconic line that’s since become a meme.
If you have played Pinhead before and are wondering why it doesn’t say its voice lines anymore, then read our article here to find out possibly why they remove the voice lines for Pinhead, also if you have been wondering when the 22nd chapter will be released, then read our article here, where we give predictions regarding chapter 22.
Dead by Daylight Initialization error Solutions
PC
The initialization error is common on PC when the Network Address Translation or NAT isn’t enabled, you can fix this by following the steps below.
- Ensure your computer is connected to your internet, open any browser and type in 192.168.0.1 or 192.168.1.1 according to your router in the address bar.
- Once entered, go to the settings page of your router
- Log In and then navigate to the Advanced menu, select “NAT forwarding” option and look for the UPnP sub-menu and enable it.
Another fix would be to verify file integrity, read the guide we have provided below.
- Open your steam library
- Right-click on Dead by Daylight
- Select “Properties” and then click on the “Local files” tab
- Click on “Verify files integrity”
- Let this run and once completed you will be prompted if any files are missing, they will begin to install automatically.
If none of the above solutions is working for you, you can try changing the account you are using to logging on a temporary basis. As for some users, this workaround is working.
Step 1: You need to log in with a new account
Step 2: You need to log out of that new account without closing the game through Xbox Game Bar, then logging back in with the bugged account. It will start working.
These above-stated fixes might not work for everyone.
On the official forum, one user has also stated another fix which has been mentioned below.
Before we move to the console solutions, we should mention that trying the solution of enabling UPnP if your router supports it should also help your consoles, hence give it a try.
Xbox
There are a lot of other reasons for consoles, such as the services could be down, click the link here to ensure that all Xbox services are up and running.
Another solution is clearing persistent storage, to do this follow the guide below.
- From your Xbox one dashboard, go to settings
- Access console settings and select “Disc and Blu Ray”
- After that select “Persistent Storage”
- Once you enter that window, select “Clear persistent storage”, let the process complete
- Once completed, restart your console
PlayStation
Similar to the Xbox, check whether the PSN services are up and running, you can check this by clicking here.
Besides that you can try Power-cycling, to do this follow the steps below.
- When your console is completely turned on, not in hibernation mode, hold the power button until the console shuts off completely, you can let go of the button once you see that the front of the LED stops flashing.
- Once the console turns off, unplug the power cord and let it sit for a couple of seconds before plugging it back in.
- After a minute or two, restart the console
This should’ve solved the issue being faced.


