Often times we find ourselves desiring to play games, but end up being disappointed due to the restrictions on the game itself. Some games are restricted to specific platforms, and can only be played there. Here, emulators jump in to make these games accessible to everyone. In this article, we are going to learn How to add games in Ryujinx. Here is everything you need to know:

Ryujinx
As I’ve mentioned above, emulators are programs that allow users to play games on their PC, which they normally wouldn’t. Ryujinx is the name of a leading program that emulates the famous Nintendo Switch. The hand-held gaming console revolutionized the hand-held console industry, but there are several titles that are only available on the platform.
The list of exclusives contains games like Mario Kart and Animal Crossing: New Horizon, to name a few. However, there is new competition around the corner for the Nintendo Switch. Valve has announced their own hand-held gaming console, which will be released anytime soon. The extensive catalog of games of Steam will be hard to compete against for the Nintendo Switch.
How to add games in Ryujinx?
Here are the steps you need to follow in order to add games to Ryujinx:

- Download your Nintendo Switch ROMs to your computer
- Make sure they are located in an easy-to-find directory.
- Open up Ryujinx and click the Options tab
- Here, select Settings.
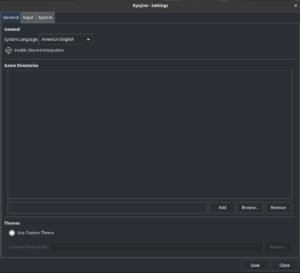
- In the General tab, click the “Browse” button which is present under the “Game Directories” section
- Proceed to select the folder where your ROMs are located
- Click Add.
- While you can have multiple file directories added to Ryujin, it is recommended to keep them all in a single place. This is to ensure ease of accessibility.
Read more about Ryujinx Emulator here:

